Mallard Head
Carving 101
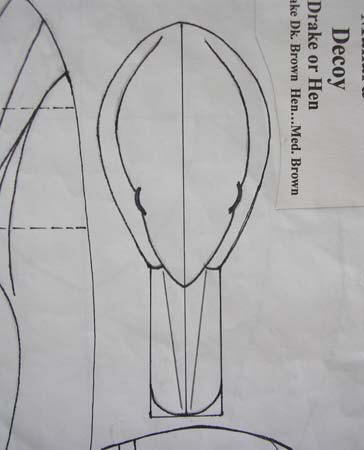
Starting with a square block of head stock
draw in a center line and locate the top view of the pattern on the
centerline and placing the end of the of the bill at the very end of the
block. Make sure that the block is slightly wider than the widest part
of the top view pattern.


Next locate the eye line
on the top view and using a Square, extend the eye line
down the side of the block. Once this is located place
the side view of the pattern on the side of the block by
aligning the eye on the eye line (push pin) and rotate
the pattern until the end of the bill touches the
outside edge of the block.

Special Note:
This cutout method will only be successful if you are using an accurate
pattern that features matching side and top views. You can usually check
a pattern with a T Square to see if the views match.
Draw around both the top and side views
of the pattern making sure to locate the eye on the side view.

Next using a drill press I locate and
drill the eye hole through the entire block making sure that my drill
press is at a right angle or 90 degrees.

At this point I should reiterate that
it is crucial to make sure you start with a squared block of wood and
your bandsaw and drill press must be set up to cut accurately at a right
angle.
With everything squared up we're ready
for the first cut. With a band saw, cut out the top view first by making
a continuous cut from front to back as seen in the illustration below.

Now its time to cut out the side view
by putting the three pieces back together forming a square block again.
I like to use a touch of hot glue to hold the block together keeping in
mind that a very small drop of glue will do the job. Next cut out the
head side view with the band saw.

Side view cutout
Discard the scrap and you have a head
cutout with two views of the pattern locked in and you are ready to
proceed to locating the carving guidelines.


Start the guidelines by drawing a
center line on the top and bottom of the cutout.


Also draw in the end of the bill shape
on the bottom of the bill. I like to use Vernier Calipers for
transferring measurements from pattern to head. The two points will give
you the same measurement as the distance between the large blades.

Next, referring to your pattern, locate
and draw in the eye channel and cheek lines on the side view of the
cutout. The circle with an X represents the high spot of the cheek or
the widest part of the head which is cheek to cheek.


Next, using the top view of the
pattern, locate and transfer the width of the crown.

Next using the side view of the head
pattern locate and transfer the bill guidelines.


Make special note of the “U” shape at
the lower corner of the bill. It is very easy to locate and transfer
this measurement by putting the points of the Vernier calipers on the
end of the bill and corner of the bill on the pattern and transferring
this measurement to the same area on your head cutout. Repeat for the
top of the bill to locate the horns.


Lastly I establish the round neck
guidelines by drawing a circle and X on the bottom of the neck. The X
helps to get equal parts.

I start the carving process by locking
in the bill. The first cut is at the corner of the bill and I use a half
round gouge to make this cut. You could use a small cylinder cutter if
you are using a power carver to make this cut. The corner of the bill is
now the same width as the rest of the bill and the corner is locked in
place.


Next I lock in the horns of the bill
with a right angle /90 degree cut. A knife or cylinder cutter will work
perfect in this area. Make sure that you do not cut below the horn
guidelines on the side view of the bill otherwise you have cut away the
top of the bill.


Next I continue the right angle cut
using the Eye Channel guideline on the side view and the Crown guideline
on the top view. This cut will lock in the width of the crown. Again it
is very important to make sue that this is a 90 degree cut. See
illustration below.


Finalized Cut

Next step is to start the neck rounding
process by making a groove cut following the illustration. This can be
done with a round rasp, round rotary rasp, or round gouge.


When making this cut remember the final
shape of the neck is round so avoid a flat cut. Guidelines on the neck
bottom will help visualize the proper rounding.

Now it's time to round the neck.


Rounding the crown is the next step.
Round from the centerline on the top of the head down to the eye
channel.


Now you can round from the eye channel
down to the cheek line.


Now you can continue the rounding
process by rounding from the cheek line into the neck area. Remember the
Circle X is the high spot of the cheek or the widest part.


Next is rounding and shaping the bill.
First draw in the shape of the bill on the bottom. The red area will be
removed. Make sure that you are looking at the bottom of the bill when
making the cut and cut with the grain to avoid splitting the bill end.


It's important to note that the widest
part of the Ducks bill is at the bottom and a warning line is located to
preserve the bills shape.
Now we can focus on rounding and final
shape of the top of the bill.

Step 1

Step 2

Step3

Step 4

Step 5
Time to sand the entire head.....It is
now safe to remove your guidelines being careful to just smooth the
surface and remove fuzz and high spots.

Step 6
Once you are finished sanding you can
re-draw in the bill guidelines and you are ready to set the eyes.


Using the pilot hole as a guide open
the eye hole to the proper size either using a half round gouge or an
eye hole drill. Mallard eye size is 10mm.


Make sure you make the hole slightly
larger than glass eye and deep enough to allow for setting the eye to
the proper depth. Fill the eye socket with either Plasticwood or Apoxie
Sculpt and press in the glass eye. Eyes should be set deep enough so the
they are not “bug-eyed” or sticking on the outside of the head. Some of
the Plasticwood or Apoxie will ooze around the eye and can be smoothed
out with a small flat brush. If you are using plastic wood use acetone
to smooth out, and water if you are using the Apoxie.

At this point you can
sand around the eye being very careful not to hit the
glass eye as it will scratch.
Next, it's time to delineate the bill
guidelines. To do this you can use a variety of tools as demonstrated in
the pictures below...

Make a "V" cut using a hook blade and
then sand back into the bill leaving defining the separation of bill and
head feathers. This will leave the feather area higher than the bill.
That edge can also be rounded over to the bill if you prefer a tighter
look.

The same procedure can be done with
power tools also. I prefer using a small cylinder shape diamond cutter
for this task. As stated above the object is to delineate the separation
and then sand smooth back into the bill.

Some carvers like to use a woodburner
for this task. Simply trace the line with the burning pen which defines
the two areas. This is a simple way to go and makes painting easier.
Even simpler is to just paint in the bill without any delineation.
Remember this is a head for a hunting decoy and the incoming waterfowl
will not know which method you used but they will be impressed with your
head shape.
I suggest carving several heads in
order to solidify the carving process and learn the various steps. Once
you feel you have mastered the steps then you can apply the steps to
other species. Questions regarding this demo or various tools used can
be answered by contacting The Duck Blind at 1-800-852-7352 or email
duckblind@mei.net.
Click below to continue
to...
Mallard Body Carving
Tutorial
Mallard Painting Tutorial
Cyber Classroom
Tutorial List
Willy
McDonald

